Studio 6B
Overview / Reminder
- Studios are a time to explore the material and refine your understanding.
- You should NOT “divide and conquer” to complete all of the studio. The time is meant for improving your understanding.
- You should ensure that everyone in your group contributes to and benefits from the work.
Artifacts for this studio
Complete the code and add answers to questions in the “Questions.md” file in the repository.
Studio Setup
The repo link Studio 6B
Instruction Encoding
Binary Encoding
Using Appendix B identify the 32-bit binary representation of the instructions (show work and answers in questions.md). Write out the final answer in hexadecimal (8 digits of hex = 32 bits).
ori s0, s1, 32or s0, s1, s2and s0, s1, s2add s0, s1, s2
Encoding Conveniences
Review the description of the ALU from homework 5. There is a way to select bits from instructions to make the ALU do the cooresponding operation. Briefly describe what bits may be candidates to identify whent he ALU should do add, or, and and operations. (Answer in questions.md)
In addition to being organized to facilite selecting operations, instructions are organized to facilitate identification of the “immediate” instructions, like ori vs. the regsiter-only variations, like or. Which bit(s) may be being used for this purpose?
Assembly Math
Complete code in math.s that will compute 3*a + b - c using only the instructions from table B.1 (compute use addition rather than multiplication). Test your work with different values.
As you’re working:
- Use the “Run & Debug” button on the left activity panel (Play button with a bug) to open the Venus assembly language simulator. It will try to start the simulator on whatever
.sfile is currently open. Actually running it will require using the “Launch with all views” button that will appear at the top of the window. - A floating panel should appear with buttons to run the code, step through line-by-line, and reload to the start. Step through the program a few times. Practice using this and the registers view to observe how the program modifies the registers as it runs.
- Examine the memory in the “Memory” pane. Currently it should show only instructions. You can use the Up and Down buttons to move to different regions of memory (or enter an address in hexadecimal)
- Stop the program, deliberatley make a typo (syntax error / invalid line or instructions) and try to run it again. Where is the error message displayed?
Stop the simulator
Be sure to use the “Stop” button to stop the simulator before movign on to a new file. Close the tab for math.s and open loops.s.
Assembly Loops
Complete the loop problem described in loops.s. You can use the forumla $ \frac{n \cdot (n+1)}{2} $ to check your work. Test your work with different values.
Memory
Again, be sure to stop any active simulation and close the prior file. Open memory.s and complete the primitive approach to initializing memory that it describes.
If time permits…Counting and Controlling LEDs
The studio repository had some errors in the setup. Please open the tasks.json by clicking on the tasks and select the “page” button rather than the run button on any task. Replace the contents of tasks.json with this: tasks.txt
The led folder contains code for controlling the UPduino’s LEDs. The LEDs are outputs of the basic module. The red, green, and blue LEDs are all combined together, which can allow you to “mix colors” by having different LEDs on and controling how long they are on.
The LEDs are “active low”. They are off when a 1 (true) and on when a 0.
- Update the code to turn on just the green LED and test your work.
- Try different variations of LEDs on/off (and more than one on at a time)
- Note that the clock runs at 6MHz and that there’s a variable for
counterprovided. Create a circuit that counts to 6,000,000 (i.e., runs for 1 second) and then resets to 0. Use that counter to make an LED (red) blink on and off for half a second each (0.5s on, 0.5s off). - You may notice the LED is very very bright. You can use the concept of “duty cycle” to control it’s brighness. For example, you could utilize the last byte of the counter, which would continually count from 0 to 255. If an LED is on when that byte is less than 127, the LED would have a duty cycle of about 50% (127/255). Adjust the duty cycle to get the LED to a comfortable brighness. (Duty cycle does not directly correlate to human perception of brightness, nor is it linear. A 50% duty cycle will not seem half as bright as when the light is fully on)
- Try to make patterns or mixes of colors using digital logic.
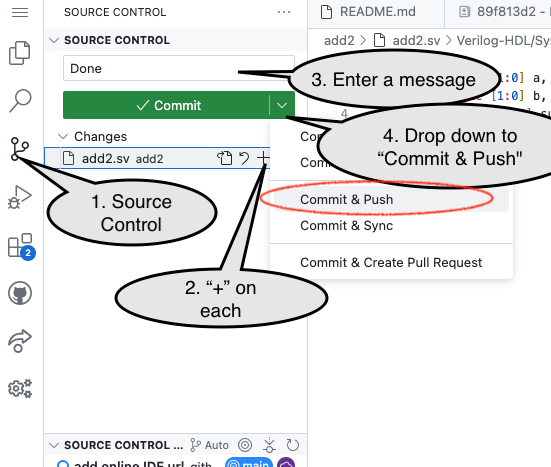
Commit and Push Work
When done, you need to “Commit and Push” work to share it back to the GitHub repository from the Codespace.

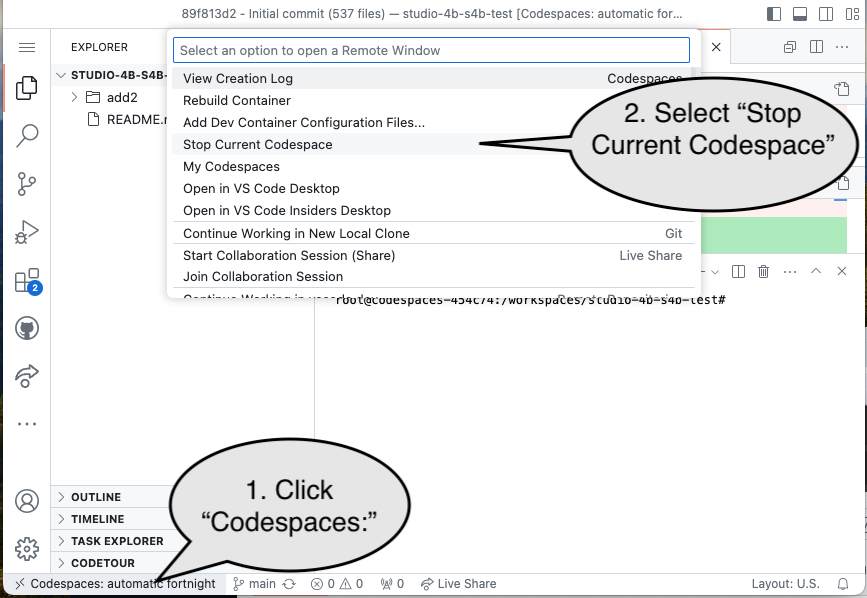
End of Studio: Stop the Codespace
Caution!
Be sure to “stop” your Codespace. You have approximately 60 hours of Codespace time per month. Codespaces often run for ~15 minutes extra if tabs are just closed.

Submission / End-of-class
Discuss your work/findings with TAs/instructors.
