Studio 5A
Overview / Reminder
- Studios are a time to explore the material and refine your understanding.
- You should NOT “divide and conquer” to complete all of the studio. The time is meant for improving your understanding.
- You should ensure that everyone in your group contributes to and benefits from the work.
Artifacts for this studio
Complete the code and add answers to questions in the “Questions.md” file in the repository.
Studio Setup
Caution!
Carefully follow the steps below! Errors can be difficult to fix!
- Everyone should log in to GitHub using the ID you want to use for the course.
- Designate one member of your group to “create a team”.
- The designated “group creator” should:
- Navigate to link
- Select their WUSTL Key from the list

- They should create a team name that starts with the studio name (
s5) followed by the last name of each member of your team separated by dashes, likes5-hu-perez-smithif the last names of your group members are Hu, Perez, and Smith.
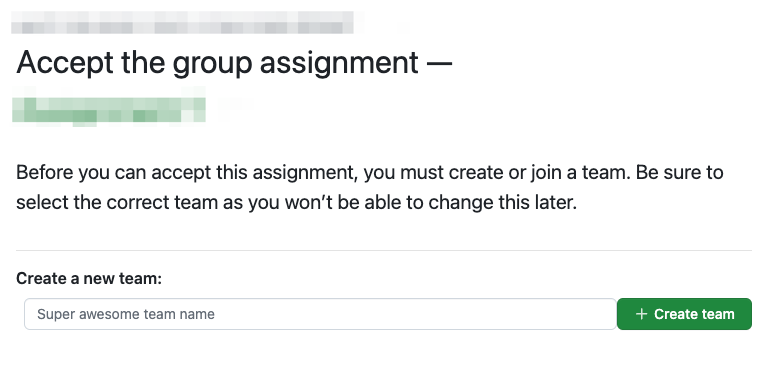
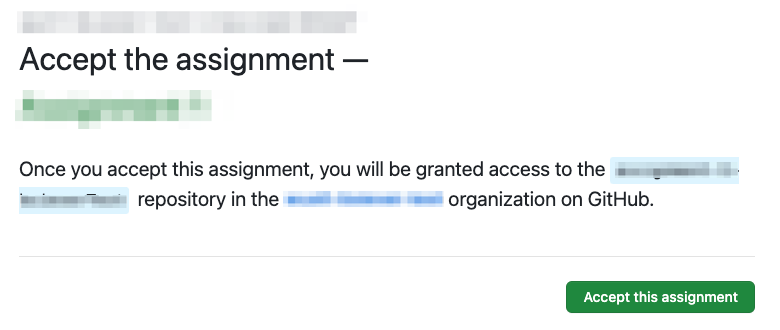
- They should “Accept the assignment”.
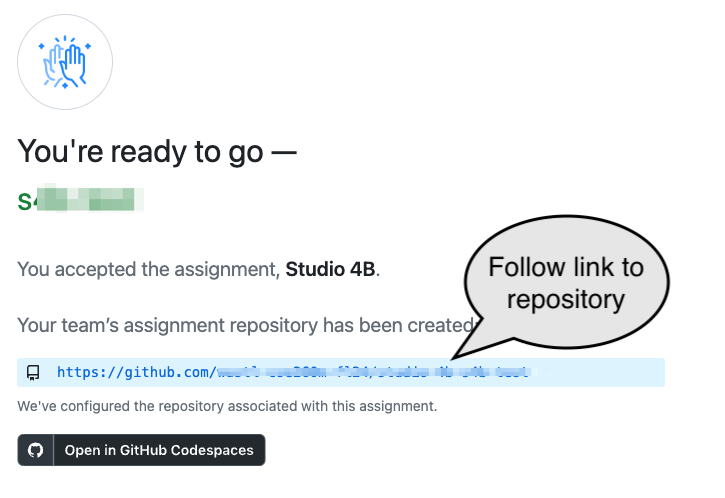
- The “group creator” should follow the link to the new repository for the group:
- Other members of your group should now:
- Navigate to the link above
- Select their WUSTL Key from the list.
- Select and join the group that was created in the last step.
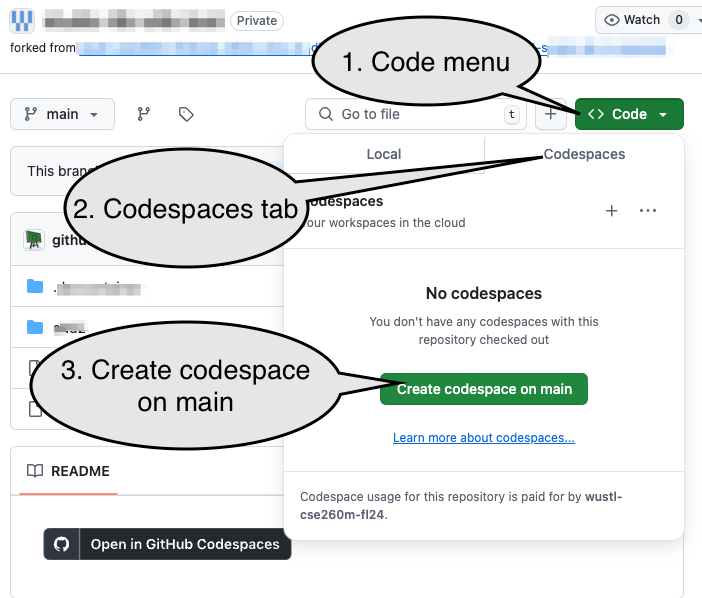
- We’ll be using a Codespace for today’s studio. You should work from a single computer. (Perhaps the “Group creator”)
- Create a code space from the repository:
Marking Down
Markdown is a common way to “format” documents and create web pages (the course web pages and site are mostly built from Markdown). Quickly review GitHub’s Basic writing and formatting syntax and complete Questions 1 Questions.md.
Markdown features
Give a brief list of some of Markdown’s features/styles (again, in 1.1 of Questions.md)
Markdown Preview
VSCode allows you to preview rendered Markdown in a side tab.
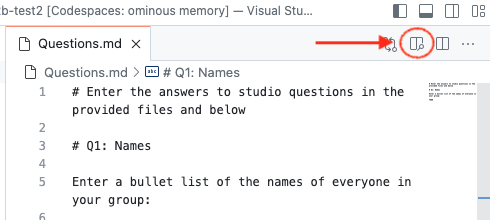
Review your Markdown perioidically to ensure the rendered version looks like you expect it to. (Tip: Keyboard shortcuts are helpful for repeated tasks. If you hover over the “Preview” icon you can find the shortcut for it).
And4: Behavioral
Open and4.sv, which you’ll use to create several approaches to AND-ing four value (A*B*C*D).
Order 1
Complete TODO 1 and simulate the circuit. Describe the synthesized circuit — does it look like you were expecting it to look?
Order 2
Comment out your prior work, complete TODO 2, and simulate the circuit. Describe the synthesized circuit — does it look like you were expecting it to look?
Order 3
Comment out your prior work, complete TODO 3.
What do you expect it to synthesize to?
What does it synthesize to? Were you right?
Caution!
The synthesis process is complex. There are optional settings that impact how it may rearrange, simplify, and optimize circuits. Although the behavior of a synthesized circuit should be correct, numerous factors influence how it’s organized and the resulting timing!
Do the default settings for simulation seem like they are producing an optimal circuit?
Multiple Drivers
Complete TODO 4: Describe both your expectations and the result.
And4: Structural
Structure 1
Verilog provides a number of primitive elements that can be used for structural descriptions using basic gates, like and, or, not, etc.
For example, or(y, a, b) represents a 2-input OR gate with output being connected to y. (You can also name the elements, like or gate1(y,a,b))
Complete TODO 5.
Structures 2, 3, and 4
Complete TODO 6 and TODO 7 (continue to provide answers in Questions.md)
Simulating And4
Imagine we’re comparing the timing of the first and second approaches to the and4 (assign and ((A*B)*C)*D vs. (A*B)*(C*D)). Which do you expect to be faster and why?
Review the test cases in and4_tb.sv. Sketch out what you think they should look like.
Run the test bench with both versions. Use the “Surfer” explorer that opens up (tab named and4_tb.vcd) to examine the timing and behavior of all the relevant signals (a, b, c, d, and y). Does the timing match your expectations? Explain.
State Machines
The statemachine folder includes the statemachine covered in class. It outputs a 1 every third cycle.
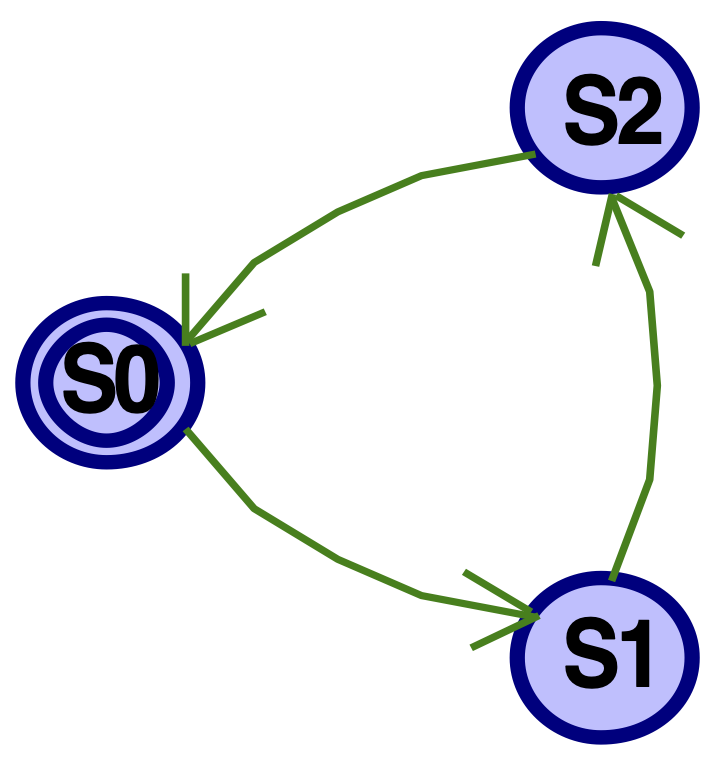
Code review
Review the code and explain:
- Where/how one would add more states.
- Where/how one would update the output equations
State Machine Synthesis
Synthesize/simulate the circuit. Review the generated circuit and try the simulation. Provide an explanation of how the synthesized circuit is appropriate (or if it’s not!).
Additions
Update the state machine with a fourth state and an input named y. If y is 0, it should behave as it has in the past (counting through three states and generating an output just in state S2). If y is a 1 when in S2, it should move to the new state and then back to S0. That is, this should make it divide by 4 rather than 3.
Simulation
Update statemachine_tb to show the bahvior of the state machine going through S0, S1, S2, S0, S1, S2, S3 (the old pattern and then the new pattern).
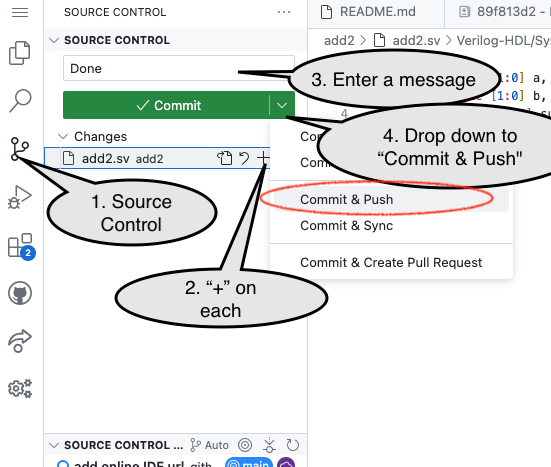
Commit and Push Work
When done, you need to “Commit and Push” work to share it back to the GitHub repository from the Codespace.
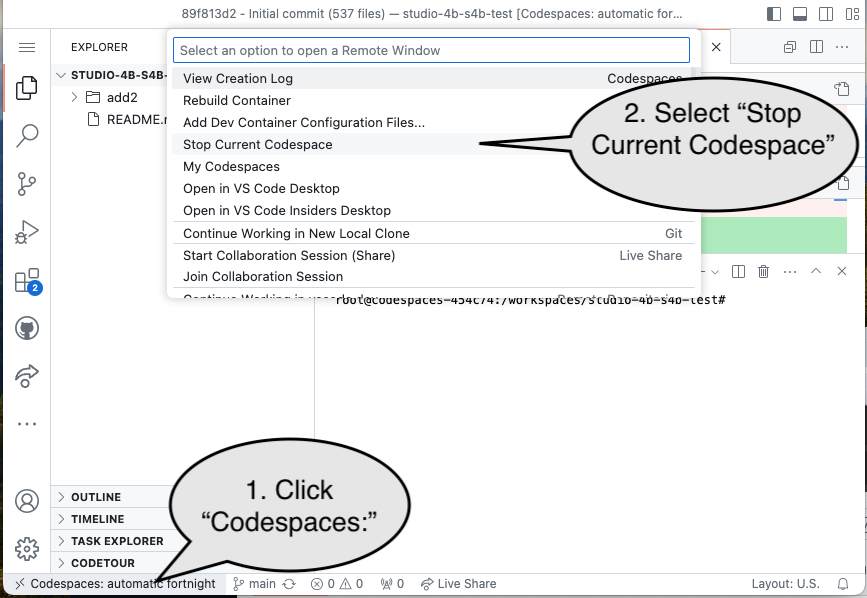
End of Studio: Stop the Codespace
Caution!
Be sure to “stop” your Codespace. You have approximately 60 hours of Codespace time per month. Codespaces often run for ~!5 minutes extra if tabs are just closed.
Submission / End-of-class
Discuss your work/findings with TAs/instructors.
